
My most recent (successful) foray was a pumpernickel bread to accompany the spinach dip a friend was bringing for Friendsgiving. Her usual modus operandi is to get a round loaf, hollow it out, put the dip in the middle, and use the removed bits as the means of getting dip to mouth. It was too good an opportunity to pass up.
the Recipe
I’ve made pumpernickel bread before but the recipe I used came out soft and a bit too chocolate-y. While I suspect this may have had to do with the quantity and type of chocolate I used, I was keen on it. That recipe allowed for a hand-shaped round and the quality would be good. Still, it had to pair well with a sour cream-based spinach dip so I ruled it out.
Instead, I chose to try the pumpernickel bread recipe from Bread Illustrated: A Step-By-Step Guide to Achieving Bakery-Quality Results At Home. This is the same book that I got my potato bread roll recipe from recently and that was such a great success that I made it two more times in as many weeks. The recipe called for a particularly long and low-temp bake to allow the loaf to dry completely which I thought would help with texture for dipping and for the bowl itself.
the Flours
Pumpernickel bread uses a combination of pumpernickel flour and bread flour. Pumpernickel is made from rye berries and uses the entire berry in a coarse grind. Rye flour uses just the endosperm (the inside bit of the berry) and tends to be a finer grind. Both are low in gluten, leading to the need for the bread flour to enhance texture. So while rye flour can be substituted for pumpernickel, it will not behave or taste quite the same.
Interestingly, the flavor I most associate with rye and pumpernickel bread doesn’t actually come from the flour used at all. It’s the caraway seeds which are almost always added that seem to be the source of the taste I think of as “rye bread.” Weird, huh?
As it happens, I did have a couple of bags of King Arthur Pumpernickel Flour in my storage here. What better time to use them than in making a pumpernickel bread? With respect to the bread flour – I honestly cannot recall if I was using King Arthur or Publix unbleached bread flour. Same basic premise either way.
the Process
the Sponge
This recipe requires a 6+ hour sponge starting with some of the pumpernickel flour, yeast, and water. Unfortunately, I tend to keep my less-used flours in a chest freezer and I’d not thought of bringing out the pumpernickel flour until I was ready to start on the process. So when I did fetch the bin with the pumpernickel flour it was freezing cold.
In order for yeast to activate and actually do some work, it needs to have moisture, something to eat, and be at a comfortable temperature. Yeast prefer to be at about the same temperature range we do. When it gets too cold, they go dormant – like at fridge or freezer temps. That meant I needed to warm up the flour for my sponge in order for the yeast to do their thing. I didn’t want to actually cook the flour though. Instead, I improvised on the recipe by using warmer water than it called for to bring the mixed temperature (dough temperature) up to about room temp.
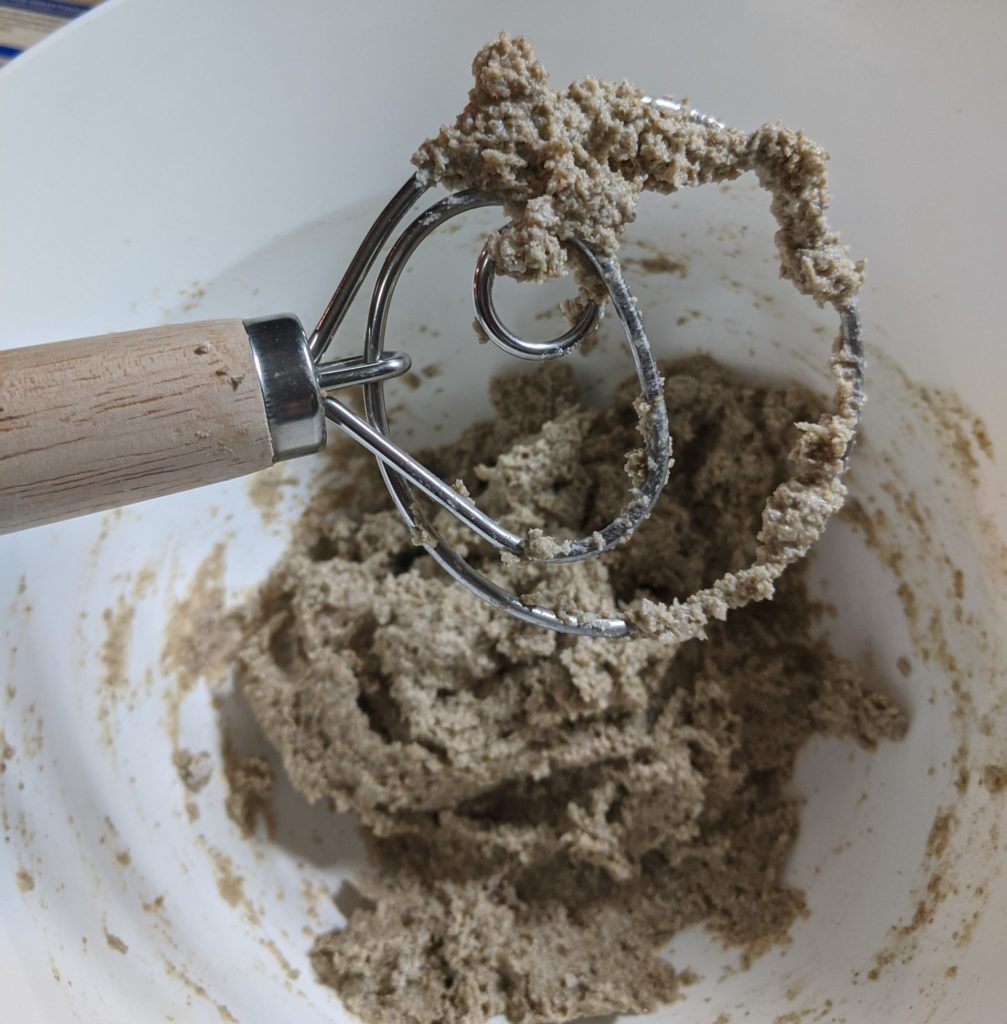
In mixing the sponge, I honest thought it would look more sponge-like. Meaning, it would have more bubbles and be perhaps looser. Partly due to the temperature issues and partly due to the coarse grind, that wasn’t really the case. The sponge looked clumpy and more like wet cement. I left this gloppy stuff in a big, covered bowl over night (about 9 hours) to sort itself out.
the Prep
Pumpernickel bread has a rich, dark brown color. The funny part is that it really borrows this color from ingredients other than the pumpernickel flour. Most pumpernickel bread uses coffee, molasses, and/or cocoa powder to achieve that signature dark hue. This recipe calls for all three of the above to lend color and flavors to the final loaf.
First, you dissolve instant espresso into some water (though I suppose you could also use really strong pour-over or French press coffee). Then add in molasses and oil. I let this cool to about room temperature before mixing it into the sponge. If you mix the coffee stuff in right away, it may be too hot and would kill off the yeast in the sponge, which kinda defeats the purpose of doing a sponge to start with. The mixture looks, admittedly, kinda gross. It’s a dark brown liquid with little clumps of what looks like curdled dairy. That’s actually what it’s supposed to look like and this constitutes the wet ingredients.
the Mix and Knead
Put the flours, caraway seeds, salt and yeast (dry ingredients) in the bowl of the stand mixer and whisk together. Using the dough hook on low speed, add in the wet ingredients. Once no dry flour remains (took a couple of bowl scrapings for me), turn up the speed and let it knead for about 8 minutes.
For what it’s worth, this made a BIG ball of dough. I only have a 4.5 qt mixer and it was struggling. I had to stop the mixer several times to push the dough down as it had come up over the top of the hook attachment. This happens when I have a dough that crawls up the sides of the bowl. One of these days I’ll get a bigger mixer… One of these days…
For the last little bit of the knead, turn out the dough onto a lightly floured surface and knead by hand. This is always my favorite part and this dough was no exception. It came together beautifully and was gorgeous to handle.
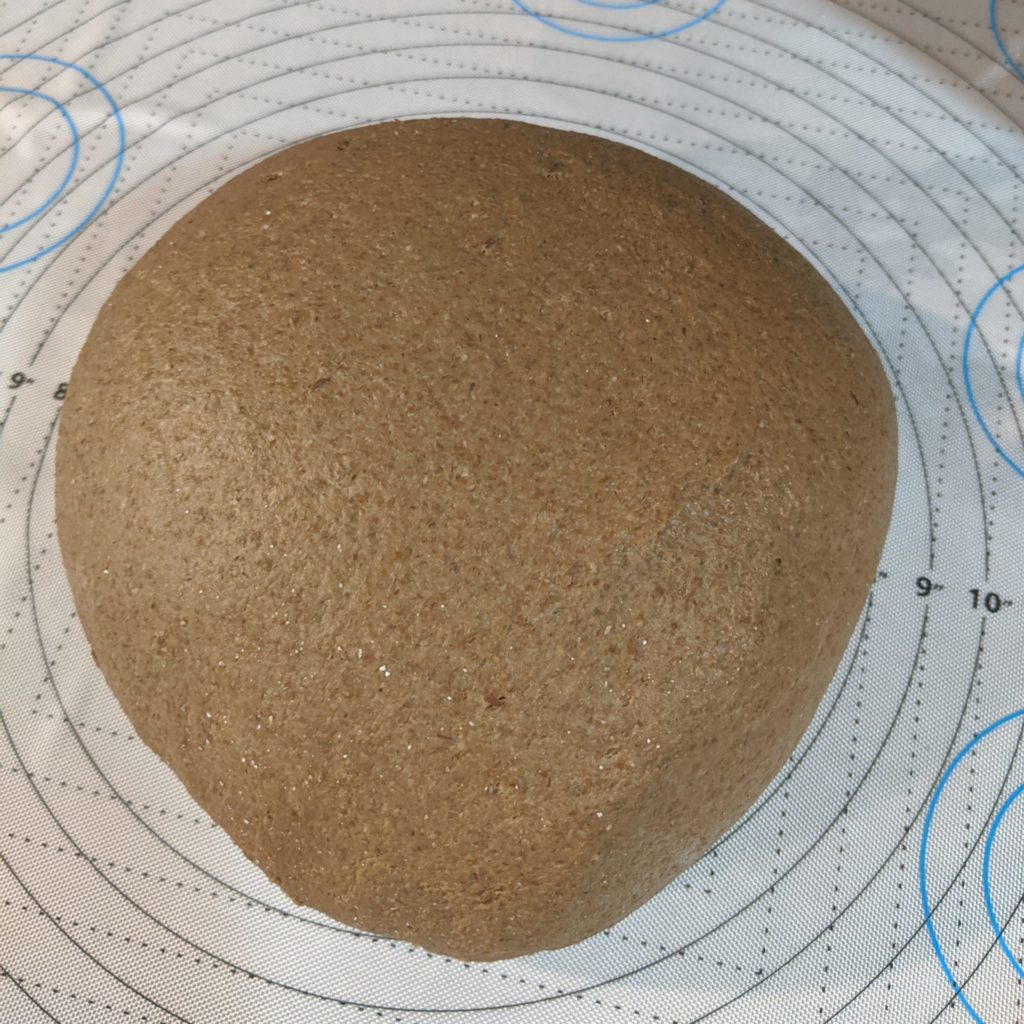
You can see even in the dough that it’s much darker than most doughs. All the dark ingredients give it a coffee brown shade at this stage. You can see from my baking mat that this was about 8 inches around. I didn’t get an elevation shot, but it was probably about 4 inches high. Like I said, this is a big ball of dough.
the Bulk Rise
The bulk rise for this beast took about and hour and a half. It could have probably gone a little longer but time was of the essence. If I didn’t get it into the oven for its massively-long bake time, I wouldn’t be able to get the turkey in on time and then Friendsgiving would be a catastrophe and the world would end (obviously). So it got an hour and a half and was looking about 1.5x as big as it had previously been.
the Shape
Here’s where things got really improvised. The official recipe calls for this to be baked in a 13 x 4 Pullman loaf pan. I do not have one of those. The closest I had was a 9 x 5 regular loaf pan (or two, given the size). But this would have defeated the purpose of the loaf. I specifically wanted a round pumpernickel bread that could be used to hold a bowl of dip.
To shape the loaf, I did the punch down and spread the dough into roughly a square. Then I brought the corners in, pinched them together, flipped the dough over and used the friction of the counter to help form it into a nice, taut ball.
I briefly considered putting the giant dough ball into a pie tin and letting it rise there. Then I figured it would probably spill over the sides so that wouldn’t work. Next option was my fancy enameled Dutch oven. The largest round one I have is 3.5 qt. Insufficient. However, right next to it is my handy and inexpensive 5 qt cast iron Dutch oven. Hello, friend.
I dusted the bottom of the Dutch oven with cornmeal and plopped the dough, seam side down, into that. Then I dusted with a little more pumpernickel flour and covered with greased plastic wrap. It was so large that the plastic wrap actually touched before I got a picture of it.
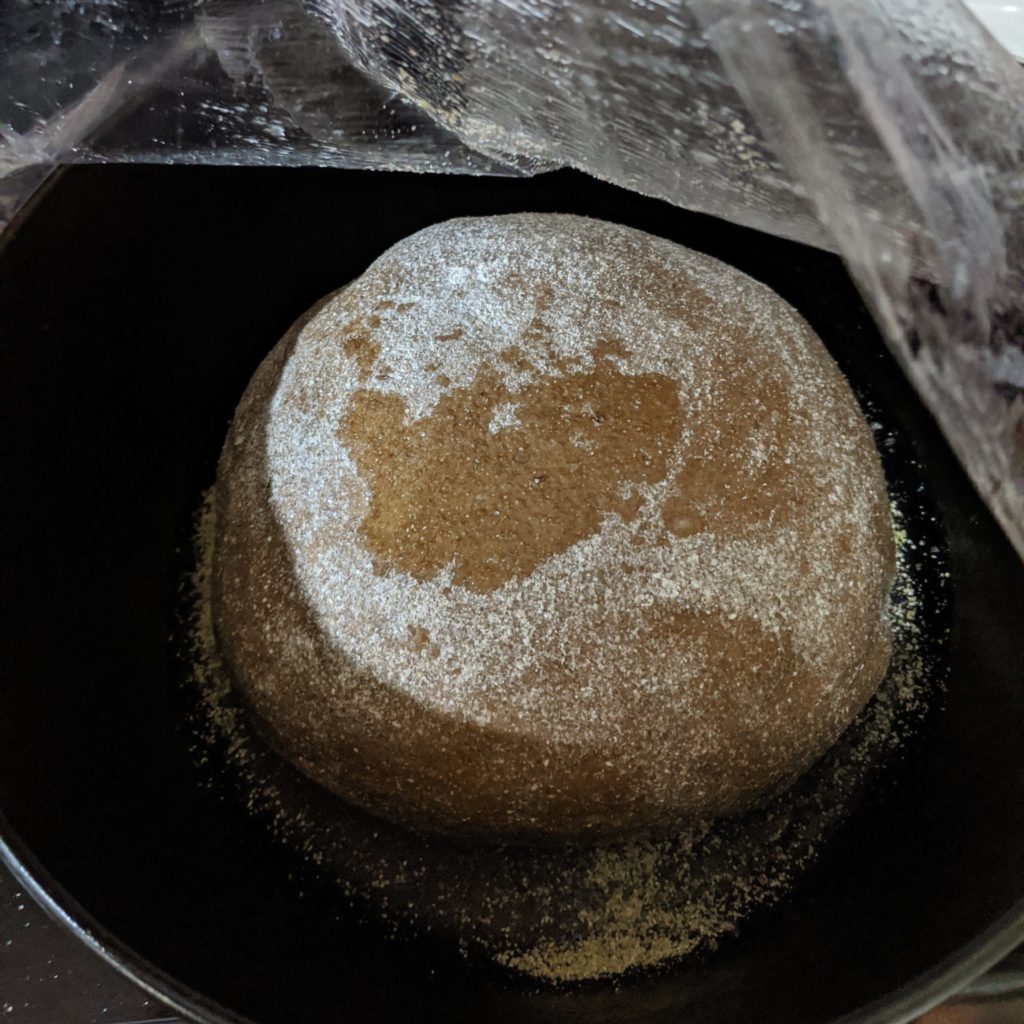
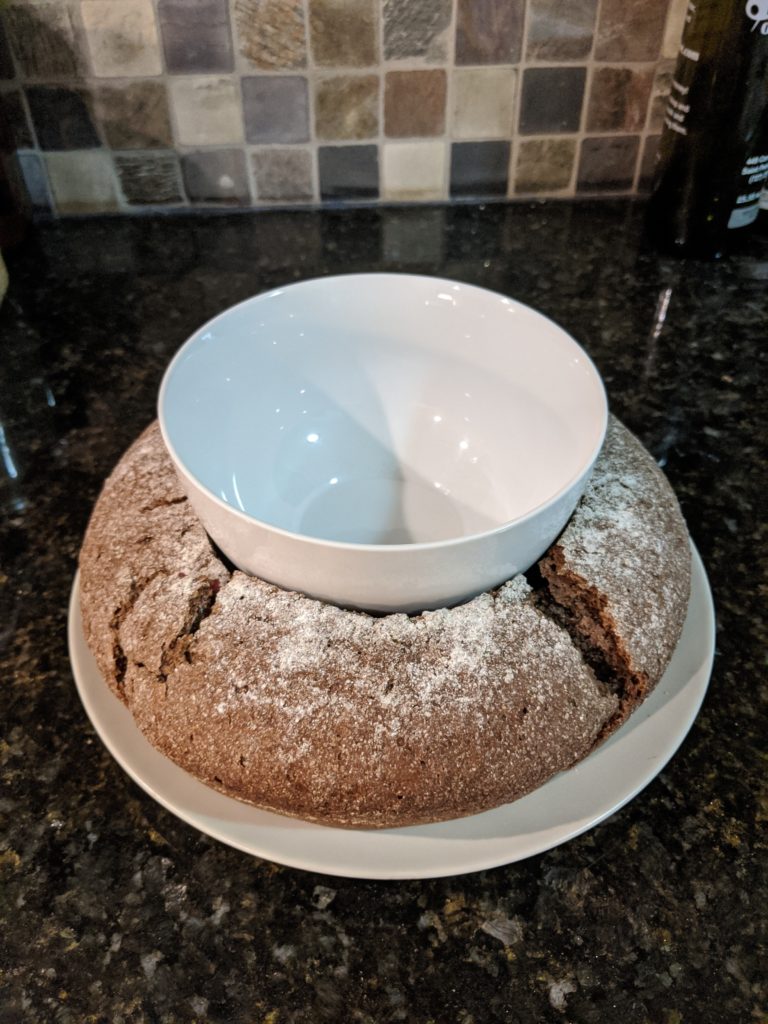
You can see in the picture that it had some room to spread out sideways. I did this purposely as I hoped it would reach the walls of the Dutch oven. That would definitely make it big enough to hollow out and place a bowl into.
the Proof
The good news is that the dough did precisely what I wanted it to. During the proof, the dough expanded primarily sideways such that it hit the walls of the Dutch oven and started climbing a little. It was just as tall as when I had placed it into the Dutch oven and had spread considerably. So far so good.
the Bake
The original recipe said to slash one line assuming you were baking in a loaf pan. Putting fun decorations on this would be pointless since it was going to get demolished before anyone saw how pretty it was. Instead, I opted for a practical “decoration” of a big circle scored in to indicate where to cut out for the dip bowl later. This gave the loaf plenty of sense of where to open, the shape I wanted it to keep, and my friend and I a reference line for cutting. I also opted to dust the loaf rather than using an egg wash because I didn’t want to alter the flavor in a way that would clash with the dip.
This calls for a low and slow bake to allow the loaf to fully dry out. Given that I was diverging from the original cooking vessel specified, I was a bit nervous about this part. The book I got the recipe from indicated that using internal temperature was unlikely to be accurate here as it could be plenty hot but still far too moist. Instead, look for a dry, dark brown crust. Unfortunately, due to my dusting of the top, it was tough to tell based on color. The ring in the top looked open and dark at 3 hours and there were a few little cracks coming off of it that made it look dry. I took it out and placed it on the cooling rack to wait its 4 hours (!!!) to cool.
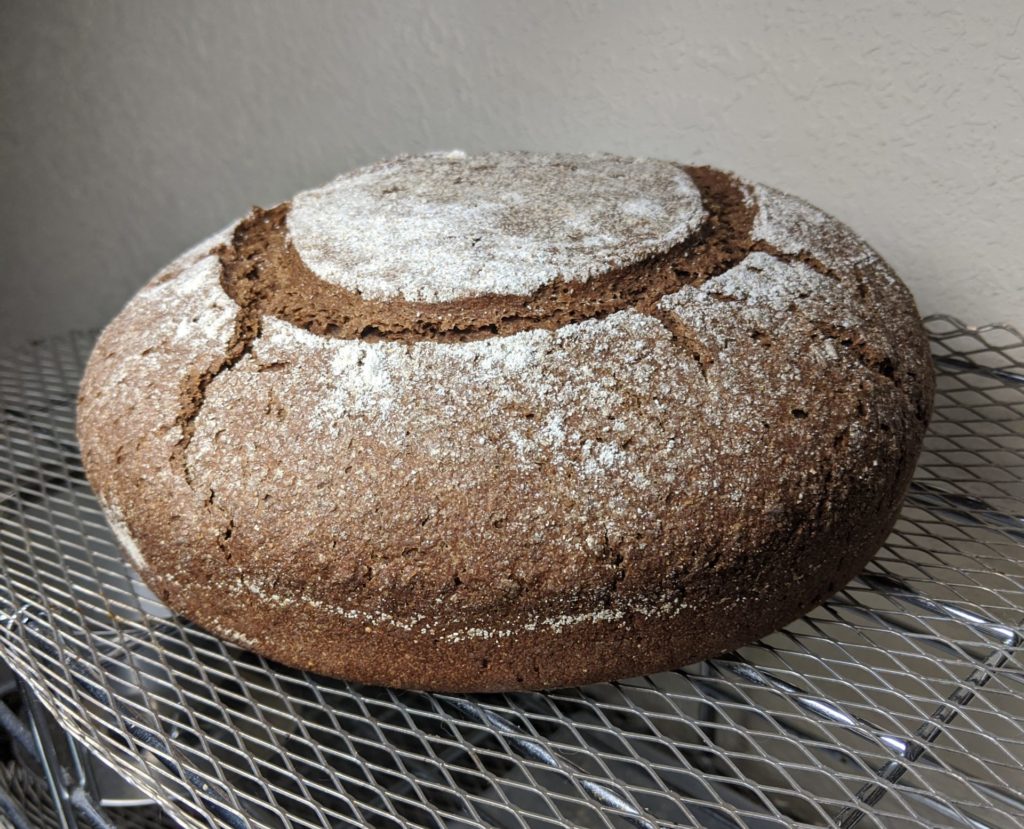
The elevation shot really shows how the bread used the Dutch oven to hold its shape and get taller. The bottom half was resting against the walls, using them as a loaf pan for both the holding of shape and heat.
the Finished Pumpernickel Bread
I’ve got to admit – this pumpernickel bread came out exactly as I’d hoped it would. My friend cut out the ring I’d scored into it and scooped out the middle. The bowl we used for the dip fit pretty well in there. I think it did crack the side open a little more but that’s fine. Both bread and dip were delicious and went great together.
The interior has a reasonably tight crumb that was dry but not so dry as to lose its cohesion. The photo below shows the inside scooped out with some of the torn up bits put in (admittedly, this photo was taken after we had devoured most of it).
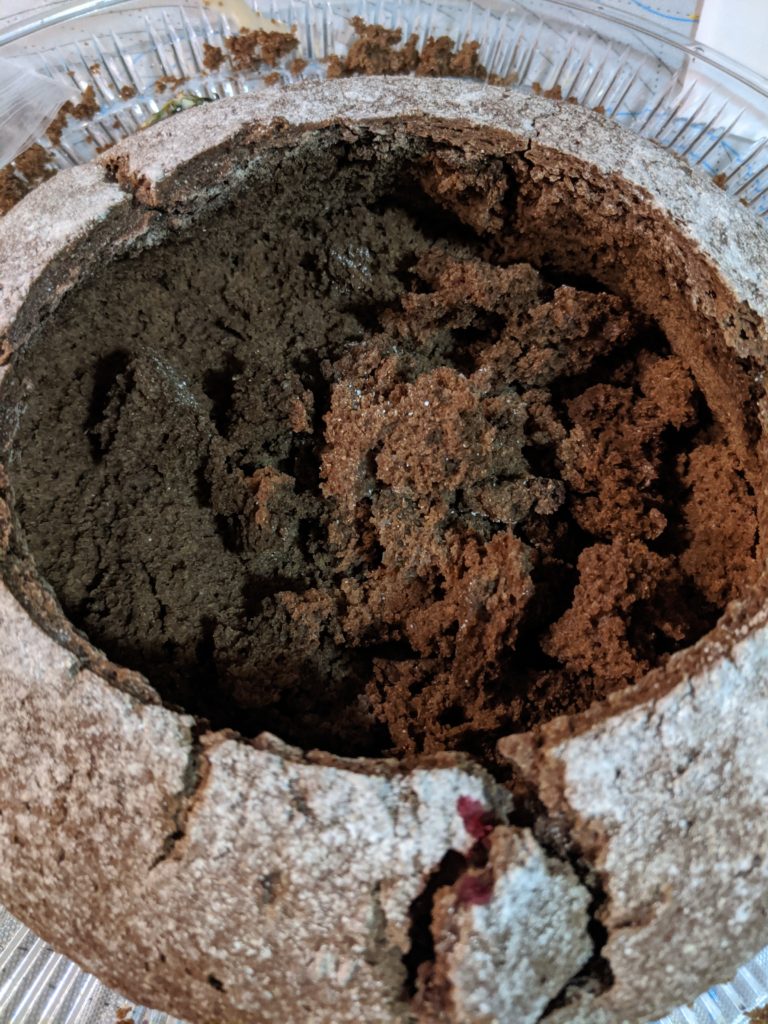
The torn up bits worked well as a conduit for the dip but weren’t really sturdy enough to actually use as a scooping mechanism. The dip was pretty thick for that. Instead, we used a spoon to prep the bread bits with dip as a more effective means of eating both.
There were only five of us here for Friendsgiving. We consumed all of the bits that had been scooped out. No one wanted to tear apart the pretty ring that the remaining bread made
my Notes for Next Time
- Try using the egg wash instead of dusting with flour. The flour looked nice against the scores but made judging the doneness of the loaf extremely difficult.
- Take the pumpernickel flour out of the freezer a day in advance. I’m not convinced that the sponge did anything overnight, to be honest. It looked about the same. Normally, I would expect to see that a starter or sponge or levain or whatever has developed some bubbles and expanded. I did not see any evidence of this in the morning and I believe it had to do with the flour being too cold.
- Try a half batch in a loaf pan. This is a rather large bread. Due to the shape and hollowing out and all, I cannot use it for much else (maybe croutons… Hmm…). I’d like to try it as a loaf that could then be used for sandwiches. Since I do not have the giant Pullman loaf tin called for, maybe a half recipe put into a normal loaf pan would do.
- Now that I think of it, turn the remainder of this loaf into herb-seasoned croutons. I’ve always loved pumpernickel croutons and this seems the perfect time to try making them. Check back for another post soon on this idea.
Pumpernickel Bread
Equipment
- 13 x 4 inch Pullman loaf pan
- Stand mixer
Ingredients
Sponge
- 208 g pumpernickel flour
- ⅛ tsp instant (rapid rise) yeast
- 1 cup water room temperature
Dough Dry Ingredients
- 546 g pumpernickel flour
- 210 g bread flour unbleached
- ¼ cup cocoa powder Dutch processed
- 1 Tbsp caraway seeds
- 1 tsp instant (rapid rise) yeast
- 1 Tbsp salt
Dough Wet Ingredients
- 1 Tbsp instant espresso powder
- 2 cups water room temperature
- ¼ cup molasses
- 2 Tbsp vegetable oil
Instructions
Mix the Sponge
- Mix together the ingredients for the sponge in a large (4+ cup) measuring cup with pouring spout.
- Cover with plastic wrap and leave out at room temperature at least 6 hours or overnight.
Make the Dough
- Dissolve instant espresso powder into water. Let cool if you heated the water beyond room temperature.
- Add molasses and vegetable oil to coffee and stir to combine.
- Add coffee mixture to the sponge in the sponge's container and mix to combine. This will likely still have some clumps of sponge.
- Place all dry ingredients into the bowl of your stand mixer and whisk to combine.
- Using the dough hook on low speed, slowly add in the wet ingredients. Mix until there is no dry flour and a cohesive dough begins to form. Stop to scrape the bowl down as needed.
- Knead on medium-low until the dough is smooth, about 8 minutes.
- Turn out dough onto a lightly floured surface (using pumpernickel flour) and hand knead for about 30 seconds.
Bulk, Shape, and Bake
- Place dough seam side down in a lightly greased large bowl. Allow to rise 1.5 to 2 hours at room temperature until about 50% larger.
- Turn out dough onto a lightly floured surface (using pumpernickel flour) and gently deflate.
- If using a Pullman loaf pan, grease with vegetable oil. Press dough out into a 12 by 10 inch (30 x 25 cm) rectangle with the long side towards you. Roll away from you to form a firm cylinder then pinch the seam and tuck the ends slightly. Place the rolled dough into the loaf pan seam side down and press gently into the corners.
- If using a Dutch oven, sprinkle some corn meal on the bottom (optional). Shape the dough into a taut round and place seam side down into the center of the Dutch oven. There should be about an inch all the way around between the dough and the walls.
- Cover loosely with greased plastic wrap and allow to rise 1.5 to 2 hours. If using a Pullman loaf pan, check that the dough is about 1/2 inch (1.25 cm) below the edge of the pan. Otherwise, press gently with your knuckle to ensure the dough springs back just a little.
- Preheat your oven to 250 F/120 C and position a rack in the lower-middle of the oven with enough height to fit your cooking vessel plus a few inches.
- Brush loaf with egg wash (or dust with pumpernickel flour) and slash about 1/2 inch (1.25 cm) deep. For a Pullman loaf, score in a long line from end to end, leaving 1/2 inch unslashed at each end. For the loaf shown in the photos, score a circle into the top instead. You can do whatever design you wish if not using this as a bowl.
- Bake for 3 hours, turning the pan around halfway through.
- Remove loaf from pan right away and allow to cool for 4 hours before serving.