
Today’s experiment was a Pain au Levain. This is a wild yeast bread with mostly white flour and a little of something else mixed in. The recipe I used was from King Arthur Flour‘s website which specifies rye or pumpernickel. You could easily swap in whole wheat, multigrain, or another grain flour. There is very little of it proportionally.
This was a first for me in several ways. It was my first levain-based bread. My first attempt at the pull-and-fold method of kneading. And my first use of my shiny new bread lame. Now it also has the distinction of being the first recipe and baked photos posted to this site!
I’ve also historically had problems with crumb structure in my sourdoughs. Namely, every loaf I’ve baked has been fairly dense. It’s risen and baked and such just never had the holes of that classic-looking sourdough. Spoiler alert – this loaf achieved holes (as pictured).
Apologies for the lack of photos along the way. While the site has been planned for a while, getting it online on the same day as this bake was not. So… you get pictures of the end result and I promise to do a better job of photo-documenting next time.
a Long Process
The total time for this bake was about 24 hours. Admittedly, most of that was rest time. Give yourself plenty of advanced preparation time and make sure you can attend to the dough the day after you set out the levain. It will take a few rounds of folding/kneading and shaping before the bake.
It is definitely worth the effort and wait.
the Levain
This bread uses a stiff levain of approximately 50% hydration. That leads to a fairly dry ball to be kneaded prior to letting it grow. It doesn’t take a lot of time, just a bit of muscle. And it is pretty small so it’s not like getting a huge upper body workout.
The recipe calls for 28 grams (2 Tbsp or 1 ounce) of sourdough starter. I opted to use half (14 grams or 1 Tbsp) of my bread flour starter and half rye starter. Except I over-scooped a bit and wound up with 32 grams of starter total. Not a big deal, really. I think it may have given a little more sour flavor than would otherwise be present. I count that as a good thing.
The levain for pain au levain needs about 8 – 12 hours to properly get itself together. In my temperature-controlled kitchen (71F / 22C at night and 74F / 24C during the day), it took the full 12 hours plus maybe a little more. In that time, the levain roughly doubles in size and gets bitty little bubbles on top. Since the levain is fairly dry, it does not develop the usual gooey, bubbly look (like pancake batter on the griddle before being flipped).
the Flours
The recipe calls for primarily using unbleached all-purpose flour. With its lower gluten concentration than bread flour, and no added vital gluten, I was a bit concerned as to its structure development. One nice feature of this recipe is the duration of time that enzymes within the dough have to get the gluten working. So it all worked out in the end.
I try to stick with King Arthur Unbleached All-Purpose flour, which has 11.7% protein and includes some malted barley flour. The protein content makes it a mid-range all-purpose flour in protein but a top-notch one all around. The malted barley flour adds more sugars for yeast to digest and usually makes the crust brown a bit more than it otherwise might.
The rye flour is Hodgson Mill stone-ground whole grain rye. It’s fairly coarse and has good flavor. The coarseness does stand in contrast to the all-purpose flour’s fine grind so you actually can see it in the dough and even, sometimes, in the final bake.
the Process
the Mix
Once the levain is ready, you tear it into pieces and put them in the water then add your flours and salt. This is a high hydration dough (approximately 84%) and so remains sticky pretty much until it goes into the oven. I started by mixing with a Danish dough whisk and then moved to using my hands just to get the flour hydrated.
the Knead
The initial knead is actually very quick – only about 3 minutes. For this, I kept the dough in a big mixing bowl and used a plastic dough scraper to pull and fold it until it looked relatively uniform. Then let it rest 30 minutes.
the Bulk Rise
The pain au levain calls for a combination bulk rise and folded knead over extended time. For each knead, turn out the dough on to an un-floured surface. Use a bench scraper (metal if your surface can handle it, plastic otherwise) to get under the dough, lift, and fold it on to itself. Go around a few times in this manner. Then scrape the dough up as one big ball and place in a greased bowl. Cover and let rise for an hour or so.
This process is repeated twice.
the Shape
Shaping the pain au levain is also a multi-step process. First, divide the dough into two equal pieces. I used the bench scraper to cut the dough in the bowl and then turned out the pieces on to a floured surface. Shape each half into a round using the surface for friction. Flip over so that the seam side is up and pinch the seams together firmly. Leave the rounds seam side up and cover with plastic wrap. Let rest 20 minutes.
The final shaping puts the loaves into the form you want them to keep during baking. For my loaves, I placed one in a well-oiled cast iron Dutch oven and the other in a well-floured brotform without a cloth liner (so it would get the flour lines). Both of mine were rounds. You could easily do ovals or batard or something more intricate on a piece of greased parchment paper.
the Proof
Let the shaped pain au levain proof for at least two hours at room temperature. You could speed it up by putting them in a proofing box or in the oven with the light on. That would likely give a less sour flavor as it will not have as much time for the sourness to develop.
If you have used a bowl or brotform for proofing, turn out the loaf gently on to a piece of parchment. If you used a Dutch oven or cloche, just open the top to check the proof and score the loaf.
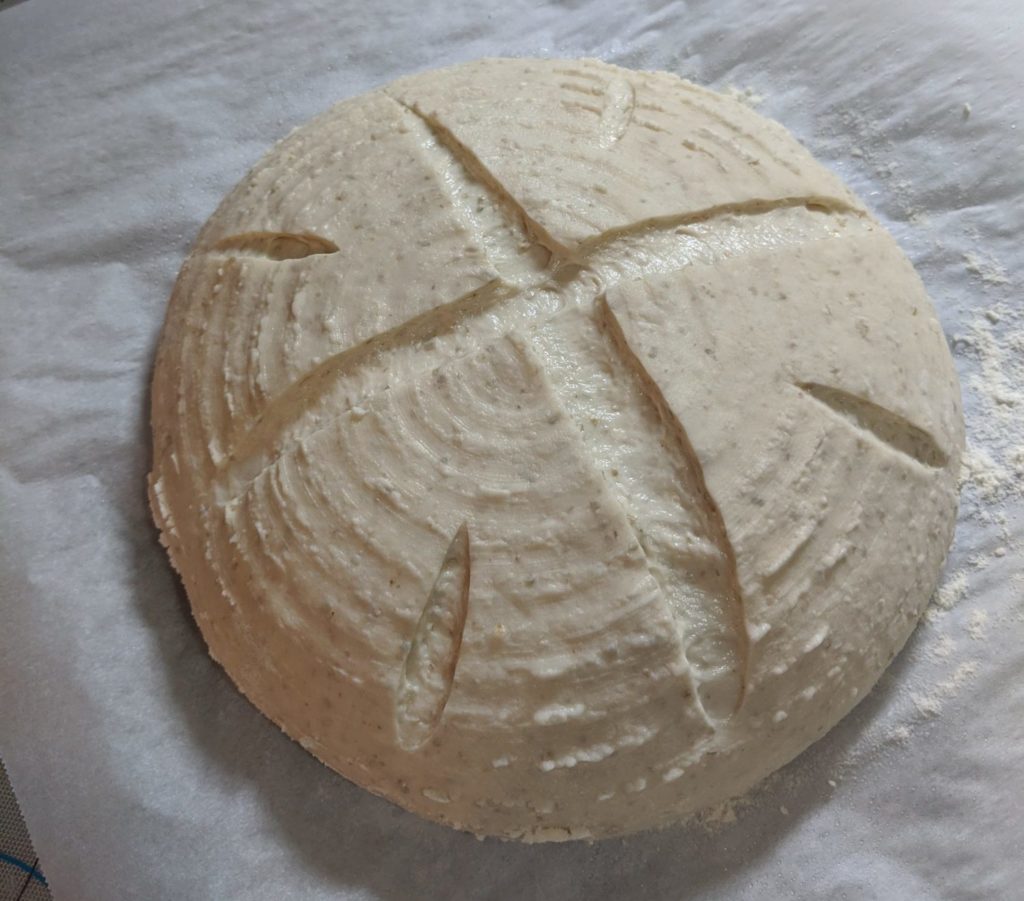
Score your pain au levain whatever way you like. I tried to replicate the design shown on the photos from the recipe I used. This was my first attempt at using a bread lame and it did come pretty close. Definitely wait to score until you’re about to put the loaves in as they will spread somewhat once cut. You don’t want to allow all the precious gases to escape.
the Bake
Preheat the oven to 450F / 230C. If you use the baking stone, include an extra pan in the oven for steam. I did not have space for this since I baked both loaves at once and the final product suffered for it. Also, spray the loaf with water just before putting it in the oven. You do not need a steam pan if you’re using a Dutch oven or cloche.
From this point, there are a couple of options and I kinda’ chose both. The first option is to wait until the oven comes up to temperature and then bake for about 35-40 minutes, removing the lid on any enclosed containers after 20. The other option is to put the Dutch oven or cloche in when the oven is cold and allow it to come up to temp gradually. Then remove the lid after about 30 minutes. I did one of each, for the most part.
The Dutch oven loaf went in cold. The stone loaf went in when the oven beeped… which was probably closer to 400F than 450F. I removed the lid from the Dutch oven around the 40 minute mark. Total time on the stone loaf was about 40-45 minutes (which was a touch too long) and the Dutch oven was about 65-70 minutes.
the Finished Pain au Levain
These two pain au levain loaves came out looking rather different. The one on the left is the one we cut through. That is the stone-baked loaf. Because this one did not get steam during the bake, it looks rather dull in color. The crust has OK depth but it should have been thicker and glossy.
The stone-baked loaf also got a huge amount of oven spring. It is about twice as tall baked as it was proofed! I suspect that this was because there was no steam and therefore the crust remained softer and more flexible for longer.
By comparison, the last picture is of the loaf from the Dutch oven. Since this got steamed in its container an dripped on, it has a glossy sheen with little bubbles on the surface.


The flavor of this pain au levain is quite good. For the amount of flour, it has a sizable portion of salt so you really can taste the sourness. That said, it doesn’t pack a tremendous sour punch. It has a mild sourness that could allow it to go well with a lot of meals.
my Notes for Next Time
- Loaves seemed relatively small, especially in the Dutch oven. This could be left as one larger loaf and simply baked longer. If needed, it could be moved to the 7-quart dutch oven as an oval instead of the 5-quart as a round.
- The loaf that was left to rise in the Dutch oven was extremely difficult to score in there with the lame. It may be worth letting it rise on parchment, preheating the Dutch oven, scoring the loaf, and then placing the loaf, parchment and all, into the hot Dutch oven and covering.
- The loaf on the baking stone got a bit darker than intended while the rest of it was properly baked. I think this is due to the fact that it was on a low rack and therefore quite close to the heating element. I’d like to try moving the stone to a higher rack to avoid the bottom burning and using a steam pan to give it a glossier crust.
- Both loaves showed considerable oven spring which distorted the scoring. I’d like to cloak the tops with flour more before scoring and baking to keep more of the definition. Also need to leave scoring to the last moment as there was some spreading even before they went in.
- I’d like to try making a batch of this with whole wheat instead of rye to see if the flavor is more mild.

Pain Au Levain
Equipment
- Large mixing bowl
- Bench scraper
- Dutch oven OR Baking stone
- Scale
Ingredients
- oil for greasing bowls
Levain
- 150 g water room temperature
- 75 g all purpose flour unbleached
- 28 g sourdough starter fed
Dough
- 482 g water ~80F / 27C
- 631 g all purpose flour unbleached
- 50 g rye flour
- 1 Tbsp kosher salt
Instructions
Prepare the Levain
- Mix the water, flour, and sourdough starter in a bowl until flour is incorporated
- Turn out and knead for a few minutes until the levain is stiff and smooth
- Place in a lightly oiled bowl and cover with plastic wrap overnight
Prepare the Dough
- Place the water in a large mixing bowl or the bowl of a stand mixer
- Tear the levain into small pieces (it will be sticky!) and put into the water
- Add flours and salt to the water and bring together until the flour is incorporated
- Either use a dough scraper to knead by hand via the pull and fold method or knead in a mixer with hook attachment on low speed for two minutes
- Cover with plastic wrap and allow to rest 30 minutes
- Either use a dough scraper to knead by hand via the pull and fold method for 3 minutes or knead in a mixer on speed 2 for 1.5 minutes
- Place the dough in a large greased bowl and cover with plastic wrap. Allow to rise for 1 hour (I left mine for 1.5 – 2 hours and it was fine…)
- Fold the dough into itself to deflate slightly then cover and leave for another hour
- Gently deflate the dough
- Turn out onto a floured surface and cut the dough in half with a bench scraper
- Shape each half into a round and pinch the seams
- Flip seam side up and cover with plastic wrap
- Rest the dough for 20 minutes
- Shape the loaves into final form
- Place in a shaping container, if desired. This can be in a floured brotform or bowl with a floured cloth seam side up, or in an oiled cloche or Dutch oven seam side down. You can also just set them on greased parchment paper and cover with greased plastic wrap.
- Cover and let rise 2 hours
- Preheat the oven to 450F / 230C with the baking stone (if using) and a cast iron or (sacrificial) broiler pan inside
- Boil some water on the stove top while the oven heats if you're planning to bake on a stone
- Slash the loaves with your preferred pattern just prior to baking then spray with a little water
- Place the loaves on the preheated stone (or the Dutch oven or cloche into the oven) and put about a cup and a half of boiling water in the preheated pan then close the oven quickly
- Remove the Dutch oven or cloche lid after 20 minutes
- Bake for a total time of about 40 minutes until the bread is acorn brown and internal temperature reads 195F / 90C
- Remove to a wire rack to let cool before slicing
1 Comments